初识shiro

前言

参考百度上说的Apache Shiro是一个强大易用的java安全框架,提供了认证、授权、加密和会话管理功能,可以为任何应用提供安全保障,而其主要为解决以下四个问题:
1、 认证-用户身份识别,常被称为用户登录
2、 授权-访问控制
3、 密码加密-保护或隐藏数据防止被偷窥
4、 会话管理-每用户相关的时间敏感的状态

架构

以下是从其官网上截取的原理图
Alt text

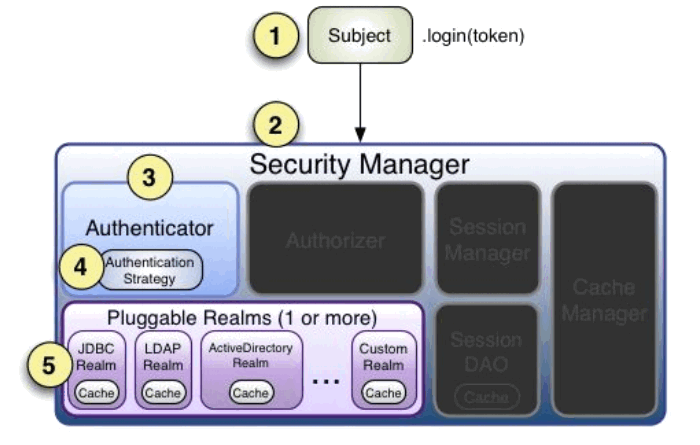
可以看出shiro的设计非常精妙,同时它不依赖于任何容器,即在java se和java ee中都可以使用,如果把shiro看做一个不透明的黑盒的话,即认证主体subject提供认证给security manager,其内部封装一些列细节方法去执行认证,这里的验证数据源可以是数据库的或者其他

下面将以用户的登录过程来模拟shiro的执行过程
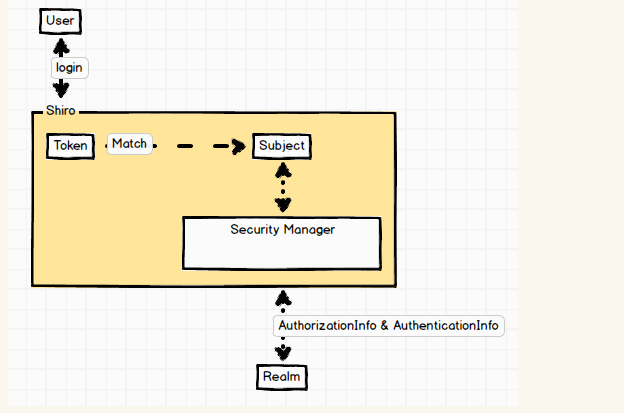
Alt text

身份认证流程

token令牌

1
2
3
4
5
6
7
8
9
10
11
12
13
14
15
16
17
18
19
20
21
22
23
24
25
26
27
28
29
30
31
32
@RequestMapping("login")
public ModelAndView login(@RequestParam("username") String username, @RequestParam("password") String password) {
UsernamePasswordToken token = new UsernamePasswordToken(username, password);
Subject subject = SecurityUtils.getSubject();
try {
subject.login(token);
} catch (IncorrectCredentialsException ice) {
// 捕获密码错误异常
ModelAndView mv = new ModelAndView("inner");
mv.addObject("message", "password error!");
return mv;
} catch (UnknownAccountException uae) {
// 捕获未知用户名异常
ModelAndView mv = new ModelAndView("inner");
mv.addObject("message", "username error!");
return mv;
} catch (ExcessiveAttemptsException eae) {
// 捕获错误登录过多的异常
ModelAndView mv = new ModelAndView("inner");
mv.addObject("message", "times error");
return mv;
}
catch (AuthenticationException eae) {
// 捕获错误登录过多的异常
ModelAndView mv = new ModelAndView("inner");
mv.addObject("message", "times error");
return mv;
}
TUserEntity user=tUserService.queryObject(username);
subject.getSession().setAttribute("user", user);
return new ModelAndView("index");
}

这里该方法接收到前台传递过来的username和password信息,类比身份证,姓名是认证,但是身份证号码是作为认证的唯一凭证,只有身份证号码正确了,这个认证也就通过了,而这里的token可以理解为用户登录的令牌,里面记录着认证信息,然后交给shiro去验证
接下来就是执行登录动作了

SecurityUtils.setSecurityManager(securityManager); // 注入SecurityManager
Subject subject = SecurityUtils.getSubject(); // 获取Subject单例对象
subject.login(token); // 登陆

其中SecurityManager是一个单例对象,即全局变量,接着SecurityUtils会自动绑定当前线程,获得subject主体,关于subject可以这样理解其包含两个信息:
Principals: 身份,可以是用户名,邮件,手机号码等等,用来标识一个登陆主体身份;
Credentials: 凭证,常见有密码,数字证书等等;
最后就是登陆了,最后通过验证token是否合法返回不同结果

认证与授权

根据流程图,接下来security manager开始执行一系列的认证手段了,其中最主要的就是
AuthorizationInfo(角色权限认证),AuthenticationInfo(身份认证),可以简单这样理解,身份认证只是验证了这个subject的存在性,如果约定subject有某些权限,如管理员有删除或者访问某些url地址权限,而这个管理员就可以抽象为角色,也就是说权限是访问资源的权利集合,而角色是权限的集合

最后的realm域,Shiro从从Realm获取安全数据(如用户、角色、权限),就是说SecurityManager要验证用户身份,那么它需要从Realm获取相应的用户进行比较以确定用户身份是否合法;也需要从Realm得到用户相应的角色,权限进行验证用户是否能进行操作;可以把Realm看成DataSource,即安全数据源

一般情况下realm需要我们自定义去实现,因为shiro不知道哪些token是合法的

1
2
3
4
5
6
7
8
9
10
11
12
13
14
15
16
17
18
19
20
21
22
23
24
25
26
27
28
29
30
31
32
33
34
35
36
37
38
39
40
41
42
43
44
45
46
47
48
49
50
51
public class OAuth2Realm extends AuthorizingRealm{
@Autowired
private TUserService tUserService;
/**
* 提供用户信息返回权限信息
*/
@Override
protected AuthorizationInfo doGetAuthorizationInfo(PrincipalCollection principals) {
String username = (String) principals.getPrimaryPrincipal();
SimpleAuthorizationInfo authorizationInfo = new SimpleAuthorizationInfo();
TUserEntity user=tUserService.queryObject(username);
// 根据id查询当前用户拥有的角色
List<TUserRoleEntity> ture=tUserService.queryRole(user.getId());
Set<TRoleEntity> roles=new HashSet<TRoleEntity>();
for(TUserRoleEntity Tures:ture){
roles.add(tUserService.queryObject(Tures.getRoleId()));
}
Set<String> roleNames=new HashSet<String>();
for(TRoleEntity rolename : roles){
roleNames.add(rolename.getRolename());
}
// 将角色名称提供给info
authorizationInfo.setRoles(roleNames);
return authorizationInfo;
}
/**
* 提供账户信息返回认证信息
*/
@Override
protected AuthenticationInfo doGetAuthenticationInfo(AuthenticationToken token) throws AuthenticationException {
String username=(String)token.getPrincipal(); // 获取用户名
// String password = new String((char[])token.getCredentials()); 得到密码
UsernamePasswordToken t = (UsernamePasswordToken) token; //得到密码
String newPassword=new String(t.getPassword());
//根据用户名从数据库取出用户完整信息
TUserEntity tuserEntity=tUserService.queryObject(username);
if(tuserEntity!=null){
//若存在,将此用户存放到登录认证info中
return new SimpleAuthenticationInfo(tuserEntity.getUsername(),tuserEntity.getPassword(), ByteSource.Util.bytes("zwl"), getName());
}
return null;
}
}

该realm类的结果就是根据token的合法性验证返回不同结果给相应的controller,目前只是从宏观上看了一个全过程,shiro是非常强大的,它的功能远不止如此

缓存机制

缓存的本质就是将原本只能存储在内存中的数据通过算法保存到硬盘上,再根据需求依次取出。可以把缓存理解为一个Map对象,通过put保存对象,再通过get取回对象。这里使用的是Ehcache缓存框架。具体代码如下:

1
2
3
4
5
6
7
8
9
10
11
12
13
14
15
16
17
18
19
20
21
22
23
24
25
26
27
28
29
30
31
32
33
34
35
36
37
38
39
40
41
42
43
44
45
46
47
48
49
50
51
52
53
54
55
56
<?xml version="1.0" encoding="UTF-8"?>
<ehcache name="es">
<diskStore path="java.io.tmpdir"/>
<!--
name:缓存名称。
maxElementsInMemory:缓存最大个数。
eternal:对象是否永久有效,一但设置了,timeout将不起作用。
timeToIdleSeconds:设置对象在失效前的允许闲置时间(单位:秒)。仅当eternal=false对象不是永久有效时使用,可选属性,默认值是0,也就是可闲置时间无穷大。
timeToLiveSeconds:设置对象在失效前允许存活时间(单位:秒)。最大时间介于创建时间和失效时间之间。仅当eternal=false对象不是永久有效时使用,默认是0.,也就是对象存活时间无穷大。
overflowToDisk:当内存中对象数量达到maxElementsInMemory时,Ehcache将会对象写到磁盘中。
diskSpoolBufferSizeMB:这个参数设置DiskStore(磁盘缓存)的缓存区大小。默认是30MB。每个Cache都应该有自己的一个缓冲区。
maxElementsOnDisk:硬盘最大缓存个数。
diskPersistent:是否缓存虚拟机重启期数据 Whether the disk store persists between restarts of the Virtual Machine. The default value is false.
diskExpiryThreadIntervalSeconds:磁盘失效线程运行时间间隔,默认是120秒。
memoryStoreEvictionPolicy:当达到maxElementsInMemory限制时,Ehcache将会根据指定的策略去清理内存。默认策略是LRU(最近最少使用)。你可以设置为FIFO(先进先出)或是LFU(较少使用)。
clearOnFlush:内存数量最大时是否清除。
-->
<defaultCache
maxEntriesLocalHeap="1000"
eternal="false"
timeToIdleSeconds="3600"
timeToLiveSeconds="3600"
overflowToDisk="false">
</defaultCache>
<cache name="shiro-authenticationCache"
maxEntriesLocalHeap="1000"
eternal="false"
timeToIdleSeconds="600"
timeToLiveSeconds="600"
overflowToDisk="false"
statistics="true">
</cache>
<cache name="shiro-authorizationCache"
maxEntriesLocalHeap="2000"
eternal="false"
timeToIdleSeconds="600"
timeToLiveSeconds="600"
overflowToDisk="false"
statistics="true">
</cache>
<cache name="shiro-userCache"
maxEntriesLocalHeap="2000"
eternal="false"
timeToIdleSeconds="600"
timeToLiveSeconds="600"
overflowToDisk="false"
statistics="true">
</cache>
</ehcache>

其中可以指定缓存的路径,这里是临时路径

散列算法

通常情况下散列和加密本质上都是一样的,即将一个Object变成一串无意义的字符串,不同点是经过散列的对象无法复原,是一个单向的过程,而加密是可以双向的,即加密与解密,所以如果忘记密码,只能进行修改密码操作,下面是在项目中用到的散列算法

1
2
3
4
5
6
7
8
9
10
11
12
private RandomNumberGenerator randomNumberGenerator = new SecureRandomNumberGenerator();
private String algorithmName = "md5";
private final int hashIterations = 2;
public void encryptPassword(TUserEntity user) {
// User对象包含最基本的字段Username和Password
String salt="zwl";
// 将用户的注册密码经过散列算法替换成一个不可逆的新密码保存进数据,散列过程使用了盐
String newPassword = new SimpleHash(algorithmName, user.getPassword(),
ByteSource.Util.bytes("zwl"), hashIterations).toHex();
user.setPassword(newPassword);
}

其中algorithmName为指定运用何种算法,hashIterations为散列次数,也就是数学中的迭代,将前一个结果作为参数在运算一次,salt盐可以理解为有了盐,并且每个盐唯一确定一个散列值,最后产生的newPassword是经过如下类

public SimpleHash(String algorithmName, Object source, Object salt, int hashIterations)

四个参数分别标识算法名称,散列对象,散列使用的salt值,散列次数。

匹配

匹配的功能就是用来匹配用户登录使用的令牌和数据库中保存的用户信息是否匹配。它的原始接口是CredentialsMatcher,一般情况下如果不自定义的话就会使用默认的实现类HashedCredentialsMatcher,如下是自定义的匹配

1
2
3
4
5
6
7
8
9
10
11
12
13
14
15
16
17
18
19
20
21
22
23
24
25
26
27
28
29
public class RetryLimitHashedCredentialsMatcher extends HashedCredentialsMatcher{
// 声明一个缓存接口,这个接口是Shiro缓存管理的一部分,它的具体实现可以通过外部容器注入
private Cache<String, AtomicInteger> passwordRetryCache;
public RetryLimitHashedCredentialsMatcher(CacheManager cacheManager) {
passwordRetryCache = cacheManager.getCache("passwordRetryCache");
}
@Override
public boolean doCredentialsMatch(AuthenticationToken token, AuthenticationInfo info) {
String username = (String) token.getPrincipal();
AtomicInteger retryCount = passwordRetryCache.get(username);
if (retryCount == null) {
retryCount = new AtomicInteger(0);
passwordRetryCache.put(username, retryCount);
}
// 自定义一个验证过程:当用户连续输入密码错误5次以上禁止用户登录一段时间
if (retryCount.incrementAndGet() > 5) {
throw new ExcessiveAttemptsException();
}
boolean match = super.doCredentialsMatch(token, info);
if (match) {
passwordRetryCache.remove(username);
}
return match;
}
}

一般情况下,匹配的异常的结果都会抛出相应的异常,如 DisabledAccountException(禁用的帐号)、LockedAccountException(锁定的帐号)、UnknownAccountException(错误的帐号)、ExcessiveAttemptsException(登录失败次数过多)、IncorrectCredentialsException (错误的凭证)、ExpiredCredentialsException(过期的凭证)等

而针对获得realm数据源的情况,会设置五张表,分别是用户表(存储用户名,密码,盐等)、角色表(角色名称,相关描述等)、权限表(权限名称,相关描述等)、用户-角色对应中间表(以用户ID和角色ID作为联合主键)、角色-权限对应中间表(以角色ID和权限ID作为联合主键),其中用户与角色之前的关系为多对多,角色与权限之间的关系也是多对多

会话

用户的一次登录即为一次会话,即session,Shiro也可以代替Tomcat等容器管理会话。而针对会话,可以处理的情况太多了,如记录用户信息和行为等等,比如保存用户信息

TUserEntity user=tUserService.queryObject(username);
subject.getSession().setAttribute(“user”, user);

ssm+shiro集成

web.xml中的配置

1
2
3
4
5
6
7
8
9
10
11
12
13
14
15
16
17
18
19
20
21
22
23
24
25
26
27
28
29
30
31
32
33
34
35
36
37
38
39
40
41
42
43
44
45
46
47
48
49
50
51
52
53
54
55
56
57
58
<?xml version="1.0" encoding="utf-8"?>
<web-app xmlns="http://java.sun.com/xml/ns/javaee"
xmlns:xsi="http://www.w3.org/2001/XMLSchema-instance"
xsi:schemaLocation="http://java.sun.com/xml/ns/javaee
http://java.sun.com/xml/ns/javaee/web-app_3_0.xsd"
version="3.0">
<!-- 修改 Servlet 版本-->
<!-- 配置 DispatcherServlet-->
<servlet>
<servlet-name>springMVC</servlet-name>
<servlet-class>org.springframework.web.servlet.DispatcherServlet</servlet-class>
<init-param>
<param-name>contextConfigLocation</param-name>
<param-value>
classpath:spring/spring-web.xml
</param-value>
</init-param>
<load-on-startup>1</load-on-startup>
<async-supported>true</async-supported>
</servlet>
<servlet-mapping>
<servlet-name>springMVC</servlet-name>
<url-pattern>/</url-pattern>
</servlet-mapping>
<context-param>
<param-name>contextConfigLocation</param-name>
<param-value>
classpath:spring/spring-service.xml,
classpath:spring/spring-dao.xml,
classpath:spring/spring-shiro.xml
</param-value>
</context-param>
<listener>
<listener-class>org.springframework.web.context.ContextLoaderListener</listener-class>
</listener>
<!-- 添加 Shiro 相关配置(应该去官网查询相应的配置信息) -->
<!-- The filter-name matches name of a 'shiroFilter' bean inside applicationContext.xml -->
<filter>
<filter-name>shiroFilter</filter-name>
<filter-class>org.springframework.web.filter.DelegatingFilterProxy</filter-class>
<init-param>
<param-name>targetFilterLifecycle</param-name>
<param-value>true</param-value>
</init-param>
</filter>
<filter-mapping>
<filter-name>shiroFilter</filter-name>
<url-pattern>/*</url-pattern>
</filter-mapping>
</web-app>

其中主要关心的是web容器将将Shiro的配置文件交给Spring监听器初始化以及配置了shiro的过滤等
这里shiro的配置都在spring-shiro.xml中配置

1
2
3
4
5
6
7
8
9
10
11
12
13
14
15
16
17
18
19
20
21
22
23
24
25
26
27
28
29
30
31
32
33
34
35
36
37
38
39
40
41
42
43
44
45
46
47
48
49
50
51
52
53
54
55
56
57
58
59
60
61
62
63
64
65
66
67
68
69
70
71
72
73
74
75
76
77
78
79
80
81
82
83
84
85
86
87
88
89
90
91
92
93
94
95
96
97
<?xml version="1.0" encoding="UTF-8"?>
<beans xmlns="http://www.springframework.org/schema/beans"
xmlns:xsi="http://www.w3.org/2001/XMLSchema-instance"
xmlns:context="http://www.springframework.org/schema/context"
xmlns:mvc="http://www.springframework.org/schema/mvc"
xsi:schemaLocation="
http://www.springframework.org/schema/beans http://www.springframework.org/schema/beans/spring-beans-4.0.xsd
http://www.springframework.org/schema/context http://www.springframework.org/schema/context/spring-context-4.0.xsd
http://www.springframework.org/schema/mvc http://www.springframework.org/schema/mvc/spring-mvc-4.0.xsd">
<!-- 声明一个密码匹配器 -->
<bean id="credentialsMatcher" class="com.hfsf.sys.oauth2.RetryLimitHashedCredentialsMatcher">
<!-- 设置该密码匹配器使用的算法是 md5 -->
<property name="hashAlgorithmName" value="md5"/>
<property name="hashIterations" value="2" />
<property name="storedCredentialsHexEncoded" value="true" />
<constructor-arg ref="ehCacheManager" />
</bean>
<!-- 声明一个自定义的 Realm -->
<bean id="myRealm" class="com.hfsf.sys.oauth2.OAuth2Realm">
<!-- 将上面声明的密码匹配器注入到自定义 Realm 的属性中去 -->
<property name="credentialsMatcher" ref="credentialsMatcher"/>
<!-- 将自定义的权限匹配器注入到自定义 Realm 中 -->
<property name="permissionResolver" ref="permissionResolver"/>
<!-- 配置缓存相关 -->
<!-- 启用缓存 -->
<property name="cachingEnabled" value="true"/>
<!-- 开启认证缓存-->
<property name="authenticationCachingEnabled" value="true"/>
<!-- 指定认证缓存的名字(与 ehcache.xml 中声明的相同) -->
<property name="authenticationCacheName" value="shiro-authenticationCache"/>
<!--开启授权缓存-->
<property name="authorizationCachingEnabled" value="true"/>
<!-- 指定授权缓存的名字(与 ehcache.xml 中声明的相同) -->
<property name="authorizationCacheName" value="shiro-authorizationCache"/>
</bean>
<!-- 自定义一个权限匹配器 -->
<bean id="permissionResolver" class="com.hfsf.sys.oauth2.UrlPermissionResolver"/>
<bean id="shiroFilter" class="org.apache.shiro.spring.web.ShiroFilterFactoryBean">
<property name="securityManager" ref="securityManager"/>
<!-- 如果认证不通过,浏览器通过 Get 方式请求到 /login 上 -->
<property name="loginUrl" value="/login.jsp"/>
<!-- override these for application-specific URLs if you like:
<property name="successUrl" value="/home.jsp"/>
<property name="unauthorizedUrl" value="/unauthorized.jsp"/> -->
<!-- defined will be automatically acquired and available via its beanName in chain -->
<property name="filterChainDefinitions">
<value>
/authc/admin = roles[admin]
/authc/** = authc
/** = anon
</value>
</property>
</bean>
<!-- 声明一个自定义的过滤器 -->
<bean id="resourceCheckFilter" class="com.hfsf.common.xss.ResourceCheckFilter">
<!-- 为上面声明的自定义过滤器注入属性值 -->
<property name="errorUrl" value="/unAuthorization"/>
</bean>
<bean id="securityManager" class="org.apache.shiro.web.mgt.DefaultWebSecurityManager">
<!-- Single realm app. If you have multiple realms, use the 'realms' property instead. -->
<!-- 设置安全管理器的安全数据源为自定义的 Realm -->
<property name="realm" ref="myRealm"/>
<!-- By default the servlet container sessions will be used. Uncomment this line
to use shiro's native sessions (see the JavaDoc for more): -->
<!-- <property name="sessionMode" value="native"/> -->
<property name="cacheManager" ref="ehCacheManager"/>
</bean>
<!-- 配置 shiro 的 ehcache 缓存相关,这个缓存只和 Realm 相关 -->
<bean id="ehCacheManager" class="org.apache.shiro.cache.ehcache.EhCacheManager"></bean>
<!-- 配置 Spring 的 EhCacheManagerFactoryBean ,须要 spring-context-support 的支持 -->
<bean id="ehCacheManagerFactoryBean" class="org.springframework.cache.ehcache.EhCacheManagerFactoryBean">
<property name="configLocation" value="classpath:ehcache.xml"/>
</bean>
<!-- 配置 Spring 的 EhCacheCacheManager,须要 spring-context-support 的支持 -->
<bean id="cacheManager" class="org.springframework.cache.ehcache.EhCacheCacheManager">
<property name="cacheManager" ref="ehCacheManagerFactoryBean"/>
</bean>
</beans>

其中最主要的是filterChainDefinitions,这里声明了权限控制用户访问哪些url,而且访问是有顺序的,即执行了前者后者将不再执行,其中anon为匿名访问,authc为需要身份认证通过才可以访问,这里的内容较多,具体参考官方文档

最后只要通过前台页面提交数据,经过一系列流程,最终就可以完成权限控制了,事实上shiro的内容很多,而且很丰富,只有不断在实践中踩坑,学习,总结才能更好的认识和运用它

热评文章